
1前言
到今天(207/3/11)为止,大亮老师的第一个mod还没有做出来。但是已经快了,因此趁现在把过程记录下。为啥?很多任务是一次性的,完成之后就忘记了。
另外一个原因,当你百度 “我的世界 mod制作” 这句话的时候,得到1350万个结果。那么你会遇到3个问题。
- 很多文章已经过时了,无法适用于现在最新的1.11.2版本。
- 很多文章是从别的网站抓来的,内容重复。(这是中文网络世界内容贴的通病。)
- 各种方案,让我不知所措。
所以我得记录下我走过的路,把失败的尝试排除掉,给同学们省点时间。
看下文之前,先理解这一条:我们要教大家的是,怎么编程做mod。所以对编程做mod有兴趣的同学继续看,只是想搜索别人做好的mod来玩一把的同学,赶紧换台。
2准备工作
作为一个只听说可以对Minecraft进行编程的人,要想实现这一点,我遇到了下面这些选项。像不像特工追捕嫌疑犯?
特别像!你要搜集所有可疑的名单,然后形成线索,然后继续搜集信息,不断的排除和锁定目标。
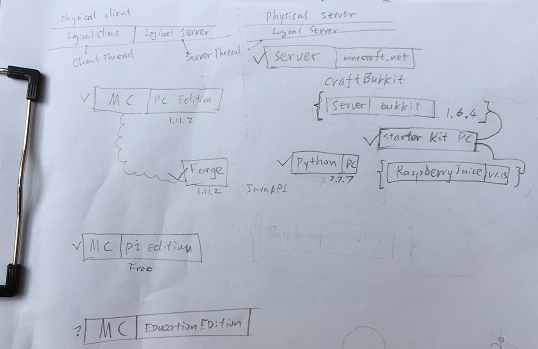
Bukkit似乎也值得研究,但是bukkit.org的网站上资料整理的不清不楚,不好下手。
网站http://files.minecraftforge.net/内容规划的清楚,比较容易懂,而且很明显forge的团队在不断更新。
所以暂时锁定目标:forge。
3安装forge
我假设你已经有正版的PC版的Minecraft,我第一次买这么贵的游戏,喜欢的游戏当然应该买正版,压岁钱就应该花在这里对吧。
3.1下载forge
首先要下载forge,于是我来到这里。http://files.minecraftforge.net/
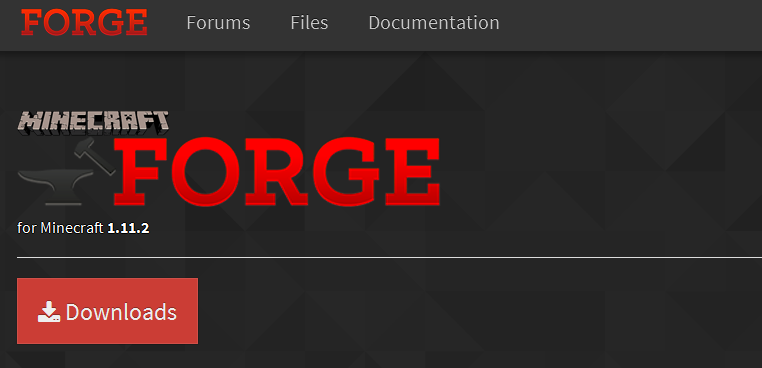
首先映入眼帘的是,for Minecraft 1.11.2 ,这就对了,因为我的MC已经自动更新为1.11.2版本了。
不过接下来的下载,会先弹出广告,而且,关键是广告页卡住不能继续下载。(骗点击量是吗)

要过这一关,需要一个小技巧。首先,复制链接地址。
你得到了这么一串:
adfoc.us/serve/sitelinks/?id=271228&url=http://files.minecraftforge.net/maven/net/minecraftforge/forge/1.11.2-13.20.0.2228/forge-1.11.2-13.20.0.2228-installer-win.exe
然后,把前面的广告部分扔掉,保留后面http://files.minecraftforge.net开头的这部分。
http://files.minecraftforge.net/maven/net/minecraftforge/forge/1.11.2-13.20.0.2228/forge-1.11.2-13.20.0.2228-installer-win.exe
这部分复制到浏览器地址栏,回车,就开始下载了。
3.2安装forge
双击下载的forge-1.11.2-13.20.0.2228-installer-win.exe,出现下面的界面,然后选择Install client。
默认情况下Mercurius是勾上的,建议去掉,这个是搜集信息的,没什么用处。
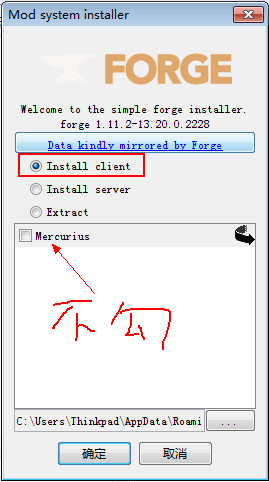
最底下的c:\users\… 这串,是安装程序自动找到的MC安装目录,我认为没必要去修改它。
然后点确定等着安装,我第一次安装没有成功,下载一个什么文件没有下载完成。囧。
后来又重新安装运行一次,下载成功了。
3.3启动MC
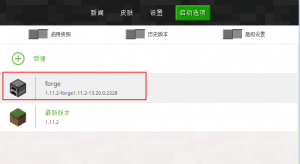
这时候打开MC,你先看看启动选项,出现了forge的选项!
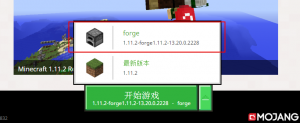
到这一步前面的工作成功了,但是如果点进去会发生什么呢,还不知道。
我进去了,看到有一匹马,我想去骑马,可是有一个巫师不断攻击我,我死了很多回。
4 开始Modding (From Zero to Modding)
参考地址 https://mcforge.readthedocs.io/en/latest/gettingstarted/
- Obtain a source distribution from forge’s files site. (Look for the Mdk file type, or Src in older 1.8/1.7 versions).

- Extract the downloaded source distribution to an empty directory. You should see a bunch of files, and an example mod is placed in
src/main/javafor you to look at. Only a few of these files are strictly necessary for mod development, and you may reuse these files for all your projects These files are:build.gradlegradlew(both.batand.sh)- The
gradlefolder
- Move the files listed above to a new folder, this will be your mod project folder.
- Open up a command prompt in the folder you created in step (3), then run
gradlew setupDecompWorkspace. This will download a bunch of artifacts from the internet needed to decompile and build Minecraft and forge. This might take some time, as it will download stuff and then decompile Minecraft. Note that, in general, these things will only need to be downloaded and decompiled once, unless you delete the gradle artifact cache. - Choose your IDE: Forge explicitly supports developing with Eclipse or IntelliJ environments, but any environment, from Netbeans to vi/emacs, can be made to work.
- For Eclipse, you should run
gradlew eclipse– this will download some more artifacts for building eclipse projects and then place the eclipse project artifacts in your current directory. - For IntelliJ, simply import the build.gradle file.
- For Eclipse, you should run
- Load your project into your IDE.
- For Eclipse, create a workspace anywhere (though the easiest location is one level above your project folder). Then simply import your project folder as a project, everything will be done automatically.
- For IntelliJ, you only need to create run configs. You can run
gradlew genIntellijRunsto do this.
不要怕,把这个当作一个游戏,一共才6关,对吧。前三步都很简单,英文是啥意思? 同学,学外语干啥用的,现在用啊。
告诉大家一个秘密,想要获得靠谱的技术资料,你必须把英文弄好了,才能看到第一手的、最好的技术资料。
所以这里我就不翻译了。(偷懒都有这么冠冕堂皇的理由;)
第3步,我创建了一个目录:mymod。把第2步提示的几个问题都copy过来了。
后面的命令都在进入这个目录之后运行。
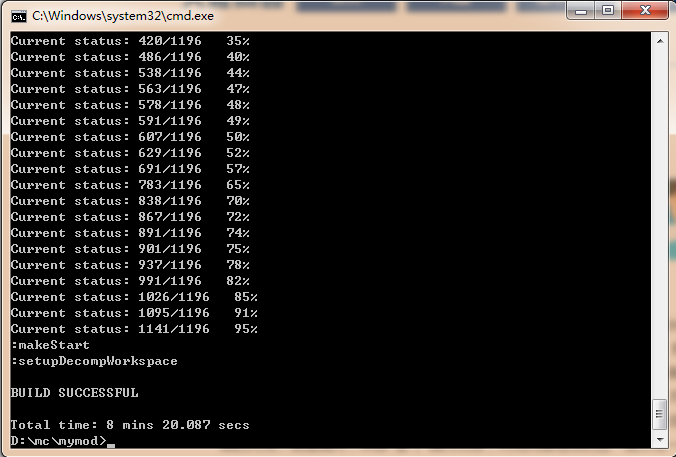
于是来到了第4步。我运行了gradlew setupDecompWorkspace。

一开始,程序欢乐的运行着,总之干了很多看不懂的事情。然而,凡事总有波折,做mod也一样,没有成功运行完成。
* What went wrong:
Execution failed for task ‘:genSrgs’.
> joptsimple/internal/Strings : Unsupported major.minor version 51.0
抓虾了,文档中没有提到这个问题该怎么解决!大亮老师在第4步遇到错误卡住了,于是把这事放了放,第二天再来。
4.1次日再战
还好,大亮老师做过好多年的Java程序员,大概知道这个错误信息是什么意思。
百度一下“ Unsupported major.minor version 51.0”,就更确定了,我电脑Java版本低了。(但愿你的电脑没有这个版本低了的问题)
安装最新的jdk,原来是1.6,升级为1.8.
我用的下载地址:
http://download.oracle.com/otn-pub/java/jdk/8u121-b13/e9e7ea248e2c4826b92b3f075a80e441/jdk-8u121-windows-x64.exe
注意,安装之后,还是要检查环境变量,确保JAVA_HOME设定为你刚才安装JDK的目录。
大亮老师怎么知道要修改JAVA_HOME的呢?
用文本编辑器打开gradlew.bat
你就发现其中代码需要JAVA_HOME了
:findJavaFromJavaHome
set JAVA_HOME=%JAVA_HOME:”=%
set JAVA_EXE=%JAVA_HOME%/bin/java.exe
终于,第4步通过。
4.2 第5步
下面是第5步的说明。
- Choose your IDE: Forge explicitly supports developing with Eclipse or IntelliJ environments, but any environment, from Netbeans to vi/emacs, can be made to work.
- For Eclipse, you should run
gradlew eclipse– this will download some more artifacts for building eclipse projects and then place the eclipse project artifacts in your current directory. - For IntelliJ, simply import the build.gradle file.
- For Eclipse, you should run
我选择Eclipse,因为这个我很熟悉。电脑上刚好也有。
我在命令行,进入我的mymod,运行 gradlew eclipse 这命令。
又悲剧了。联网失败。
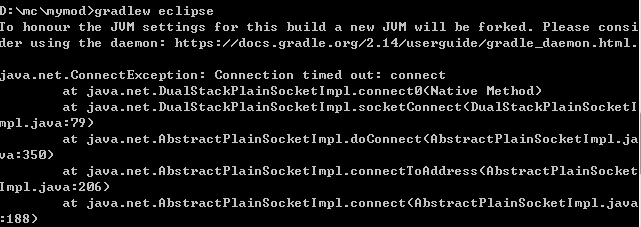
但是,耐心等了一会之后,还是继续在下载什么东西。但愿,第一步的问题不会影响到整体。
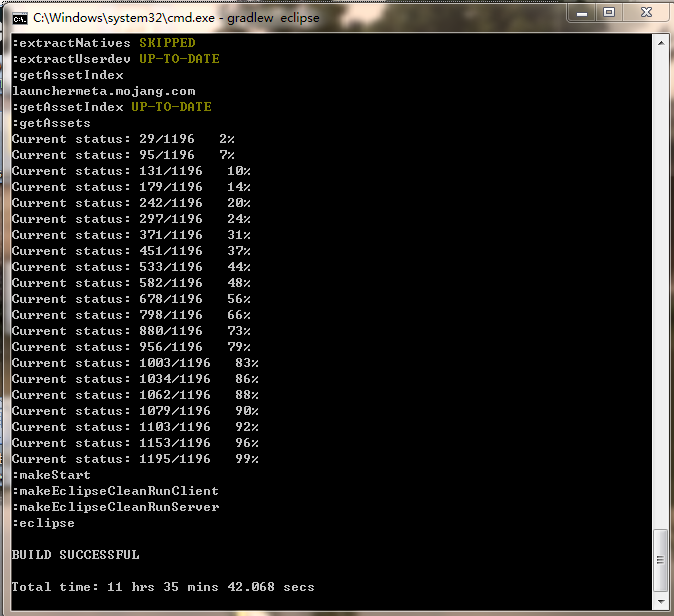
可是,真的好慢……
你猜我怎么对付这种问题,我把电脑开着,回家睡觉去了!
第2天早上一来,嘿,一个惊喜等着我。居然完成了!用了11个小时35分钟42秒!
4.3 第6步
Load your project into your IDE.
- For Eclipse, create a workspace anywhere (though the easiest location is one level above your project folder). Then simply import your project folder as a project, everything will be done automatically.
- For IntelliJ, you only need to create run configs. You can run
gradlew genIntellijRunsto do this
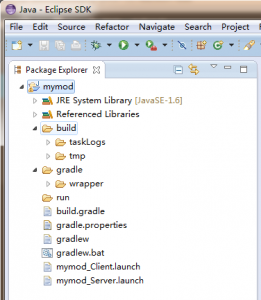
按照提示,在mymod的上一级目录创建workspace,然后创建项目叫mymod,得到了这样的一个project。
不知接下来是否顺利,且听下回分解。
5 Customizing Your Mod Information
Edit the build.gradle file to customize how your mod is built (the file names, versions, and other things).
These customizations are highly recommended for all projects.
- To change the name of the file you build – edit the value of
archivesBaseNameto suit. - To change your “maven coordinates” – edit the value of
groupas well. - To change the version number – edit the value of
version.
在Eclipse中,打开文件 build.gradle ,找到下面的信息做修改。
version = “1.0”
group = “cn.welovecode.modid” // http://maven.apache.org/guides/mini/guide-naming-conventions.html
archivesBaseName = “modid”
以上是我的修改。注意,不要改动别的地方,除非你知道改了有什么用。
6Building and Testing Your Mod
接下来是最激动人心的部分,第一个Mod要被build出来并且测试运行了!
- To build your mod, run
gradlew build. This will output a file inbuild/libswith the name[archivesBaseName]-[version].jar. This file can be placed in themodsfolder of a forge enabled Minecraft setup, and distributed. - To test run with your mod, the easiest way is to use the run configs that were generated when you set up your project. Otherwise, you can run
gradlew runClient. This will launch Minecraft from the<runDir>location, including your mod code. There are various customizations to this command. Consult the ForgeGradle cookbook for more information. - You can also run a dedicated server using the server run config, or
gradlew runServer. This will launch the Minecraft server with it’s GUI.
我运行了第1个命令,我很疑惑,我一行代码还没写呢,这样运行下来之后得到的是什么呢?
没错,在mymod/build/libs目录下面,出现了modid-1.0.jar这个文件。然而还是疑惑,这个jar文件能干什么呢
然后我运行了第2步的命令,gradlew runClient,启动了一个Minecraft。
进去玩了一圈。但是Mod在哪里?

到目前为止,一行代码没写,一个mod没搞出来,但是,准备工作似乎应该完成了。本文也已经太长了,且看下文继续。